
Instructions

for Fitting and Putting On the Elizabeth Pink Surgical Bra®

Step 1: Determine Size

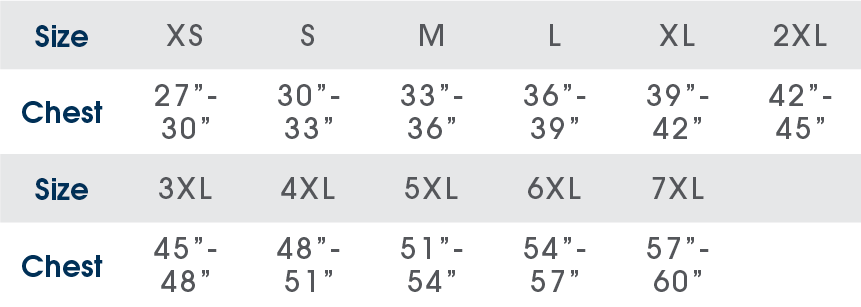
  • Measure around fullest part of bust.
  • Look up corresponding size on the Masthead® bra size chart.
  • If there will be padding or dressing applied, select one size larger.

Step 2: Unpack and Put on Bra

When putting bra on patient in the OR:

  • Remove bra from plastic packaging.
  • Open shoulder, side, and front Velcro fasteners.
  • Place opened bra completely flat on table under drapes, with inside of bra facing up.
  • At the completion of surgery, after drapes are removed, wrap the bra around patient and close front Velcro.
  • Close and adjust shoulder openings.

When patient is putting bra on herself:

  • Remove bra from plastic packaging.
  • Open front Velcro closure, put on bra.
  • Re-close shoulder fasteners on bra by pressing end of front hooked Velcro tab onto end of soft back looped tab.

Step 3: Adjust for JP Drains

For patient with drains:

  • Tunnel JP drain tubing through opening on side of bra nearest surgical site.
  • Twist/unsnap ring hanging from front of bra to open.
  • Attach plastic loop on bulb to plastic ring, snap ring closed.
  • If using bra with convertible loops and rings, move the loops/rings to the side needed, and save the removed loop(s)/ring(s).

For patient without drains:

  • At provider’s discretion, cut off drain loops/plastic rings (but save the rings–they may come in handy).

Step 4: Adjust Velcro Closures

  • Close Velcro from bottom to top along center opening.
  • Adjust Velcro shoulder tabs and side closures for secure but comfortable fit.
  • Bra closures can be easily loosened or tightened as necessary.

Step 5: Washing Instructions

  • Close all Velcro before laundering.
  • Wash in warm water with mild detergent gentle cycle, line dry.
  • DO NOT PUT IN THE DRYER.